Do you make some or all of your living from painting furniture
or has it become an important part of your life? Do you feel like you
would like to learn more and achieve more exciting professional
finishes, then the Ultimate Furniture Painting Class is for you. The
next class runs 19th - 22nd May 2014. Anyone who is in the business of
upcycling, repurposing and furniture restoration cannot fail to benefit
immediately from this class. Taught by Cait Whitson and Gibson
Donaldson, they bring their combined experience of over 40 years working
in the field. Cait has been teaching decorative finishes for 25 years.
See more details on our website here and book in the shop here
and there is a great discount if you pay in full before April 22nd of
10% off. Opt for full payment and use the code UFP10 at the checkout.
Exciting gilding finishes
Furniture painting has become a huge trend and it has brought so many new faces into the decorative painting business that I have loved all my adult life, it is wonderful to have so many converted to the painting faith.
a student's cabinet elegantly finished in eggshell, and gilded and stencilled
But what differentiates the professional from the amateur? These days I often compare painting to photography - everyone's a photographer since digital took the world by storm (well except me I have NEVER been a good photographer) and everyone's a painter, the DIY stores are filled with people ready to give it a go ......yet the message boards and blogs are full of queries about how to resolve things that haven't gone as expected.
Painting things can be easy if you stick to a small range of techniques and finishes but what happens when you want to branch out? It's not rocket science granted, but a little knowledge can make a big difference to how a project turns out and can make a piece look a million dollars
not rocket science - hand painted bee eaters
They say knowledge is power and this is very true in the painting game. If you only know a little bit you will only be able to achieve a little bit. Very simple tips and tricks can make the difference, building a really sound foundation of confidence is based on knowledge and technique. Many people say to me "but I am not artistic"; then we show them a few tricks of the trade and they realise that they are....and that they can achieve a lot more than basic paint finishes. This class can fast track you to a new level.
students who have never hand painted a design before
free hand carriage lines and hand painting
learning to use professional tools for success
Working with a range of different types of paints and achieving a professional finish can be challenging if you don't have breadth of experience and although you read books and blogs and watch programmes on TV, when it says to "sand" how much sanding does that mean....with which sandpaper? When it says to apply 2 coats what brush to use?
So this is what we teach in the Ultimate Painting Class - we discuss primers and sandpaper and different types of paint and the names for paint. We show you fillers and brushes; how to hold a brush and how to get a brush-mark free finish. We let you play with resists, additives and glazes and we teach techniques from traditional to trendy. There are a whole raft of metallic finishes; stencilling with a twist - enhanced and embossed; freehand carriage lines and decoration; ragging dragging, stippling, linen, moire; gilding, patinating embossing;graining and marbling and finally topcoats.
embossing, foil gilding and glazing
student sample of ragging and moire
Each student brings a piece of furniture and completes an "apprentice piece". If you are a student flying in from afar we source a piece for you to work on.
the big reveal on the finish
glazed and completed with studio dog Rosie's help
a truly authentic looking finish
dragged, bamboo and linen finishes
marvellous marbling
The Ultimate Painting Class is 4 days for 4 students to immerse themselves in paint.
Treat yourself to total immersion here and remember to add your special code UFP10 for a great discount on payment in full
***Please note that we have closed comments regarding Chalk Paint. Carte Blanche are no longer stockists and the paint has changed in UK a little and we feel that we can no longer comment accurately about its performance as we could in the past. We hope that the article and comments below are useful but for technical advice we would suggest contacting your local supplier or speaking to Oxford - Annie Sloan Head Quarters***
This is part 2 of a set of answers to questions that I see regularly coming up as search terms in my website statistics with regard to using Chalk Paint™. This set deal with waxing and although I have written an extensive piece about using the wax, here are a bunch of extra things that might I hope answer your queries and stop confusion. I hope I have covered everything and if you have more....just shout and lets see if we can answer them in the comments. These
responses and answers are drawn from my own experience and are my
opinions and I am always interested if people can add more from their
own experience so if you have more info please feel free to comment.
Antibes Green antiqued with Annie Sloan Dark Wax
Can you put a sealer/another paint over wax and Annie Sloan Soft Wax? - No. Annie Sloan Chalk Paint™ is the only paint product on the market that you can put over wax. And before you ask...even if you only put a little bit on?...NO. And again NO NO NO!!!! let me repeat - Annie Sloan Chalk Paint™
is the only paint product on the market that you can put over wax. And
now please don't tell me you did it anyway and it seemed OK, because it
will peel, scratch and other dull stuff. The answer is still NO
Can Annie Sloan Soft Wax be used over any paint? - possibly but with no guarantees, it is designed for the soft absorbancy of her own paint
Can I tint Annie Sloan Soft Wax? - yes you can, you can actually use the paint to tint
tinting the wax
How long does Annie Sloan Soft Wax need to cure? - this is an odd question because drying and curing are 2 different things. If you are asking how long to leave it before buffing, I normally recommend waiting at least a few hours (vague or what eh?) If you are unsure I would say at least 4 hours. Easiest is to leave it overnight, grab some towelling or cheesecloth and buff. but if you are desperate to finish in the same day then leave it till it stops feeling sticky.
Can I paint over Annie Sloan Soft Wax/Annie Sloan Dark Wax? - yes you can with Annie Sloan Chalk Paint™, see the first question.
Can I seal Annie Sloan Chalk Paint™ with shellac so I don't use so much wax? - well, you could, but it is a bit of a silly idea. The wax was created by the manufacturer with the Annie Sloan Chalk Paint™ in mind as a flexible creative sealant and protector. If you paint shellac over the surface then it is sealed. It is sealed with a brittle rigid finish that has no flexibility in finish or style. Shellac doesn't like water much and will bloom.....so you could but for all the cost saving, I can't actually see the point.
How soon after painting should I be waxing? - when you are sure the paint is dry. Dry time for the paint is variable depending on how humid it is and how much air flow you have where you are painting. Air flow helps speed drying in a warm dry atmosphere; humidity is not your friend if speed is on your mind....
Do I need the wax brush - no you don't NEED it ......but you want it I know, it is a lovely tool and will aid your waxing over larger areas
What does Annie Sloan Clear Wax do? - it seals andprotects, it is water repellent and strong and makes a good connection to the paint and it is a flexible creative material to work with that gives a soft attractive lustre that ages beautifully.
What does Annie Sloan Dark Wax do? - You use the dark wax to age and enhance any texture to your paintwork. You apply Annie Sloan Clear Soft
Wax first then apply apply Dark Soft Wax. Wipe off any excess, then use
the Clear Soft Wax to take more off if you need to.
When you wax with Annie Sloan Dark Wax can you just do some areas?- yes, you can use it as much or as little as you want
Can you use Annie Sloan Soft Wax over cabinets - yes you can, 3 coats really good protection on kitchen cabinets. Here is what Annie says about it "Refresh every now and again with some more Soft Wax when its needed.
Wipe over with a damp cloth to clean. Using a strong cleaner like Mr
Muscle may be necessary for stubborn marks but it will remove some wax
and the area will need rewaxing."
How much buffing does Annie Sloan Soft Wax require - well, just enough LOL. The more you buff the higher the sheen...so how shiny you want it?? high shine will dull over time but a wee buff will bring it back up....maybe refresh the wax every now and again.....just the same as you would with fine wooden furniture. Like it dull? well don't buff, or buff a bit and allow to dull over time.
How do you clean the wax off Annie Sloan Wax Brushes - if your brush is a dedicated wax brush then warm water and soap. If you use the same brush to paint as you do to wax then I would suggest you use a little white spirit to rinse the brush first and then warm water and soap
I hope these tips will help everyone with successful painting and waxing....more than anything Chalk Paint™ is designed to be fun and easy, if it feels difficult then think about changing how you do it...thin the paint maybe, use a brush to apply wax instead of a cloth, keep it simple and fun and please feel free to ask questions about the process here.
I know it has been forever since I posted here.....you must have thought I had forgotten about you, but I hadn't. I am back and determined to post here more often as we have so many lovely things happening.
Here is a little job I did toward the end of last year that was just a sweet project and I have been meaning to write about it ever since.
It's a long time since I was asked to do a bravura finish. What is a bravura finish you ask, it is one of the rather over the top finishes popular in the 1980's tortoiseshell, malachite, lapis lazuli and other dramatic finishes. It was rather lovely to be invited to do a little tortoiseshell accent recently.
This little accent also had rather a lovely story behind it.
Tortoiseshell accent
The client is a theatre director in and had at one time worked at the Mermaid Theatre, sadly no longer here. He had been at that time writing for the theatre and was commissioned to co-write the story that became the musical "Cole" about Cole Porter first performed at the Mermaid. During his research he went to New York and had the opportunity to see Cole Porter's apartment at the Waldorf Astoria. which was designed by the wonderful and inimitable Billy Baldwin.
a momento of the theatre that is no longer there
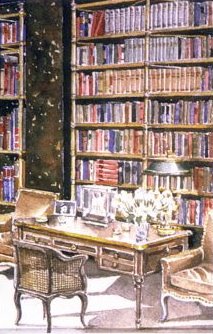
Billy Baldwin designed a beautiful library for Cole Porter made from tubular brass floor-to-ceiling bookcase-étagères that were set against lacquered faux tortoiseshell walls and Alan adored it, always holding its memory as something he would like to pay tribute to in his own home.
The return to Scotland and a new home to decorate gave him the perfect opportunity and so we set about adding a decorative accent, just to 2 small areas of the drawing room....just enough to give Billy his tribute.
The first stage of the process applied over an alarming yellow
Since the time of the Roman Empire Tortoiseshell has been considered a beautiful luxurious material and well into the 20th Century tortoiseshell was used to make elegant combs and brushes, jewellery boxes, and ornaments but tragically it was made from the Hawksbill Turtle shell and the exploitation of the turtle for its shell decimated populations and this turtle is now an endangered species. Thankfully, in 1977 the tortoiseshell trade was finally prohibited and the production of new material is banned, although I believe that there is still an illegal trade in the material. So save turtles have painted tortoiseshell!!!
The natural material would normally be made up as a series of small pieces, and on certain projects I would consider painting it as if it was small pieces but decided in this instance that the flow would be spoiled.
***Please note that we have closed comments regarding Chalk Paint. Carte Blanche are no longer stockists and the paint has changed in UK a little and we feel that we can no longer comment accurately about its performance as we could in the past. We hope that the article and comments below are useful but for technical advice we would suggest contacting your local supplier or speaking to Oxford - Annie Sloan Head Quarters***
I get a lot of emails asking me questions about the application of Annie Sloan Chalk Paint™
And when I check my website statistics I see a
lot of times that people are searching for “Annie Sloan Chalk Paint™
how to use?” or “Annie Sloan paint tips” and lots of other similar questions and I thought....."but it is so easy, why would you even ask?". But I am thinking that maybe we need to do a bit more to help folks so I put all the questions I could see were asked over and over and I answered them here ...I hope I have covered most of them and if you have more....just shout and lets see if we can answer them in the comments. These responses and answers are drawn from my own experience and are my opinions and I am always interested if people can add more from their own experience so if you have more info please feel free to comment
Annie Sloan Chalk Paint™ prime before? - No. Annie Sloan Chalk Paint™ will go over most surfaces without the need for a primer - varnished, waxed, prepainted, french polished surfaces are all fine...concrete, masonry, brick and most metals. Those surfaces that might need some extra help are few and far between....UPVC doesn't accept the paint easily, glass isn't great....but it will hold well for the likes of shop window display painting (not permanent).
Do I need two coats of Annie Sloan Chalk Paint™? - sometimes yes and sometimes no. Very often one coat will suffice but it depends on what you are painting and the look you are trying to achieve. Experiment is the answer....buy a cheap length of skirting or go and scrounge some off-cuts of timber from a builder and just try it and see. It always says on hair dye products to test 24 hours before but how many of us do??? If you are brave enough to dye your hair without a test then probably painting furniture (which is not attached to your body) should be less daunting. Putting right a mistake with Chalk Paint™ is a lot easier than with hair dye so why not just see.
Annie Sloan Chalk Paint™ best book? - my personal view is that the best book for really understanding the paint finishes is Quick and Easy Paint Transformations - by Annie Sloan which has 50 step by step transformations of mainly old furniture but includes some other surfaces - floors, metal, new furniture, a cement pot. It is a really good basic course in a book.
Quick and Easy Paint Transformations
How to apply Annie Sloan Chalk Paint™? - you can apply it with brush, roller or spray although I think the best way to apply for most projects is brush. It is so easy and quick to use a brush and by the time you have go the roller and tray or set up your spray rig you an have had half of it painted. We use low pile rollers if and when we do use then (not often) and to spray we use HVLP and thin 10-20% depending on the consistency of the paint....it varies, being an artisan paint
How much paint should you put on brush with Annie Sloan Chalk Paint™? - this depends on the type of brush you are using and the length of the bristles, if I was using an Annie Sloan brush like this one I would put a little more than is shown in this image
I would say add a bit more than this to your brush
Do I need to sand Annie Sloan Chalk Paint™? - it depends on the look you want, you can use sandpaper to sand through to colours or timber beneath the topcoat and this can be done after waxing or you can just even out texture or rub through the dark antiqued paint to show some highlights. You need to play with the paint to see all that it can do
How to even out Annie Sloan Chalk Paint™ ? - OK well this pops up regularly and I am never sure what people mean...so I have 3 answers here. To even out colour, if, for instance you have applied the paint in a patchy way and not realised it till the waxing phase, add a little of the paint to the wax and blend that onto the surface; to even out brush marks if you are not happy with texture there are 2 approaches - first is to apply a thick coat first and then a very light sand when dry, then thin the second coat and apply with a quality brush and don't overwork, lay off lightly and deftly for a brush mark free finish; second is to put 2 coats of paint on and sand with fine sandpaper (220/240 grit). Dry sanding is not to be gone at like a dervish it is not a forgiving way to work (better for the less experienced to wax first and then sand if they are distressing etc) but if you want a "baby's butt smooth" - sorry about the technical terms there - finish then it is a great way to achieve. Just go canny as they say in Scotland
Can I use Annie Sloan Chalk Paint™ on floor tiles/can you paint tile with Annie Sloan Chalk Paint™/Can you use Annie Sloan Soft Wax - This has to be a matter of common sense. You can paint concrete floors and you can paint slate and marble so the paint will stick to some surfaces but how hard wearing it will be on floor tiles I do not know, it all depends on how good the adhesion has been and on the top coating. If you apply 3 coats of hard-wearing polyacrylic floor varnish then it should be OK providing you have got the adhesion but if it is a high traffic area or if you have a lot of friends with high healed shoes then it will just be as hard wearing as any normal floor paint. If the varnish is broken right through to the paint beneath and then washed heavily the paint will lift....so maintain the varnish and keep it sealed. On tiles again I would use a good dollop of common sense. If the tiles are going to come into a lot of wear then...maybe not the best product but if it is an area that wipe sensibly and not have to scrub at then why not give it a try. Superslick tiles may need a primer or some heavy etching, tiles in the shower are not suitable to be painted at all. Wax is fine for wall tiles (3 coats for high traffic areas like kitchens. Wax is not right for floors.
Annie Sloan Chalk Paint™ on brick/Annie Sloan Chalk Paint™ on brick on masonry?- yesit is fine for both if the surface is sound
How long should Annie Sloan Chalk Paint™dry before waxing? - this depends on atmospheric conditions and also on how thickly applied it is. It can be as little as 20 minutes or as long as 2 or 3 hours. Some people say to leave it overnight and I am not sure why as there is no technical reason why it should be left that long. The paint does calcify over time, so it will get harder but if you are waxing I can't see a reason to leave it any more than ...until it is dry.
I have a part 2 to do and this will deal with waxing questions but meantime I will leave you with this really delightful tutorial from Annie which will help the beginner get to grips with what the paint can do
Metallics are the new most fashionable finish and they are a lot of fun. Probably the colour we have used least of so far is copper in metal leaf and I have no idea why....maybe just no-one had asked for it. Recently we found ourselves using buckets of copper and what a wonderful finish it is!!
My favourite is this copper dome in one of Fasque's bathrooms
broken copper over hot pink
And what was it made us think to even offer this look? Well next door is the most fabulous restored copper bottom bathtub.
J. Bolding and Sons Bath beautifully restored
Tony O’Donnell, managing director of Kent based bath specialists
Catchpole and Rye, was stunned when he was asked to restore a 19th
Century copper bath from the A-listed Fasque House near Fettercairn,
where four-time prime minister William Gladstone lived.
The bath was custom made by John Bolding & Sons Ltd. in London and even in the late 1800s would have been particularly rare.
Matching mantel
Here's a mantel we matched in broken copper again but a tighter finish than the dome....easier to show you a close up
Close Up
A great fun finish that links the with the traditional.
Why is it so hard? Why do so many people struggle with choosing colour? Why do I hear the phrase "how many shades of cream do they need! No wonder it takes the Mrs that long to choose a colour for the walls..."
It's because most people cannot imagine how the room will look when it is done and because it is a big commitment. Paint is cheap (per sq metre/ft it is still the cheapest thing you will put in your home) but labour is expensive. Whether you are having a professional do the work or whether you are spending your hard earned holiday time doing it yourself, if you get it wrong it is either way a costly mistake. It is also always the largest area in a single material....which seems like a big thing to get wrong.
Dulux's latest advert shows us how the wrong colour can make you want to leave home ...
At Carte Blanche we offer a colour consultancy service and the service is there to help people through the mire of colours and finishes and to save them from a million sample pots and when we first arrive a wall like this is often what we are greeted by
Thank you to FiELDy for this photo
This invariably doesn't help...and actually if you read the great blog post that I took this photo from you will see that the owner of the room found the colour a totally different way....by being in a space painted in it.
So why get a professional to help from Carte Blanche. Well first of all we paint out all your splodges and we ban you from sample pots and then we help you define what you want. We find a starting point - some people start with a totally blank canvas but this is rare most people have chosen some items already that they have decided will go into or will remain in the room. It is then a matter of getting inside the client's head and discovering what their taste is.
Here is an example of our work. This couple came to us with the kitchen that needed updating. The kitchen was a really good quality one and it was well designed but the doors were very dated. We enlisted Andrew Fitzpatrick, our favourite cabinet maker to design, make and fit new doors and update a few of the more outdated elements like the cooker hood.
Here are the befores -
The client had Italian tiles on countertops and backsplash and really good quality terracotta tiles on the floor that they wanted to keep but it is a little dated that look...and we really needed to think of a good colour combo to make this look contemporary. Crisp off-white cabinets and ceiling and a surprising soft heathery, slightly pinky grey helps tie the warm wooden knobs and the terracotta floor looks sharp and new. It also picks up on the terracotta background that the Italian tiles have - they are glazed but you can just see the terracotta hue shining through..
I think we achieved a clean and contemporary look and the client is delighted.
If you would like us to help then give us a call 01738 587600 - we charge between £50 and £150 per room for colours, depending on how complex the scheme elements are. Some rooms might need many colours to make the best of architectural features. We produce large painted samples of the colours and suggested accent colours and guide you through choice of paint too to suit your lifestyle.
If you don't want professional help here are a few tips:
Start with things that are known facts...what will be in the room? Try to make sure that you have the lighting as it will be when the room is complete - lighting can totally change a colour
Cut your choices down to 3 colours. More than 3 colours becomes a mish-mash...and confuses the eye.
Paint 3 large (A2 paper size if possible, definitely no smaller than A4) samples of each colour. Apply 2 coats to each sample and paint to the very edge.
One colour at a time, place one sample in a dark part of the room and one in a light and one in area where artificial light plays a large part.
Keep them up there so you can see them in different lights, day time, day time with artificial light and evening
Immediately discard one colour...this is an imperative. Choosing between 2 colours is a lot simpler
Put two samples of the same colour either side of the darkest corner of the room and you will see how the internal reflection will give you the colour at its most intense.
MAKE A DECISION!
Here are a few toys to help you understand how colour works and how it might affect your room.
Color Scheme Designer is a great toy - it's actually meant to be used for designing websites but it really helps to understand how colour works together. Here you can see a complementary colour scheme - where opposites are used together to great effect
Another fun toy is from Crown - not that I am endorsing their paint or otherwise, but this wee tool is great for getting ideas http://www.crownpaint.co.uk/scheme/957/magnolia.htm
This tool takes a photo of a fairly standard room.....there are a number covering the whole house and lets you change the colours of each of the elements of the room. . Be careful though - the colours you see on the computer screen are potentially very far from the actual paint colours. Tester pots are probably essential for most people to make a final
comparison (just as the printed catalogues aren't 100% accurate to the
paints)
This is my final tip.......it's a biggy
Q.What happens if I get it wrong....what if after all that I don't like the colour? A. Change your lighting before you start changing the colour....you will be amazed how a different coloured bulb can dramatically change a room.
***Please note that we have closed comments regarding Chalk Paint. Carte Blanche are no longer stockists and the paint has changed in UK a little and we feel that we can no longer comment accurately about its performance as we could in the past. We hope that the article and comments below are useful but for technical advice we would suggest contacting your local supplier or speaking to Oxford - Annie Sloan Head Quarters***
So you have completed the painting of your piece of furniture in Annie Sloan® Chalk Paint™ and you have completed it in record time because you didn't need to strip, prime or even sand it but now you need to seal it and Annie Sloan® recommend Annie Sloan™ Soft Wax.
The wax in action in the studio
So why should you use Annie Sloan™ Soft Wax and what makes it different from just any old furniture wax? Annie chose this wax for good reasons and there are a lot of benefits to this wax that we can share with you here.
First of all it is soft...I know that's a bit obvious given it is called "soft wax" but Annie Sloan® Soft Wax is buttery soft and so application is easy with a brush or cloth (more on brushes below). It also means that you can get it absorbed into all the nooks and crannies.
Next it is compatible with the paint ....and not all topcoats are. It is part of a system. That means we can also advise you about use, troubleshoot and if you use something else we as stockists can't necessarily help.
It buffs to a beautiful soft lustre
You can mix it with the paint to make a coloured wax (keep reading, I know it sounds bizarre)
and to me THIS IS THE BIGGY!!!!!!! Annie Sloan® Soft Wax has no drying accelerator. "Oh Wow" I can hear you say in a sort of underwhelmed sort of a way but wait....let me tell you why that is important. Wax dries and hardens when the solvent evaporates from the surface and most of the waxes on the market have a drying accelerator in to speed this process up. The accelerator drives the solvent off the surface so it dries almost as fast as you apply and drives it where???? STRAIGHT INTO YOUR LUNGS. Annie Sloan® Soft Wax dries and hardens naturally and the solvent evaporates probably mainly while you are off having a cup of tea.
sit back and wait for the wax to dry
Now, don't get me wrong, this product still has a solvent and I am not about to suggest that you climb inside a cupboard and wax it with the door closed....this would not be good. But for normal waxing this product is not going to leave you head-achy and with a lung full of solvent whereas I know from experience how horrid others can be for your health.
Because the wax dries slowly you do also need to let it dry...properly...before you buff.
Top Tips For Using Annie Sloan™ Soft Wax
new wax brush - call the studio 01738 587600 they are in stock now!
Apply thin coats and work the wax in well. You can use a cloth or the
new wax brush. The wax might look like lard but try not to dig huge lumps out
and just lard it on. If you have too much on, wipe off the excess with a
clean cloth
The new wax brush applies the wax evenly and especially over large areas is going to make life easier and the job quicker
For kitchen units and high traffic areas apply 3 coats. Allow each coat to dry before applying the next - I would wait overnight
WAIT BEFORE BUFFING!!!!!!! This will make your life so much easier. Best for buffing is an old towel and if you leave it to dry it makes it much less work. Not only that if you buff over wax that isn't dry, you may harden the top of it leaving the thin wax beneath soft. Then when you put a cup or mug on it it will break through the surface leaving rings
Put Annie Sloan™ clear wax on before applying the Annie Sloan™ dark wax. Over large areas use the clear wax to control how much of the dark wax remains on the surface. This is something we cover in the classes and can be a little tricky for someone new to the
process, so practice....have a sample board to hand to play with before
you do your lovely furniture.
applying the dark wax
To sum up, most problems are caused by :
too much wax being applied
buffing too soon
rushing the process
One final tip. Every now and again the solvent from the wax sucks straight into the paint and makes it look a little patchy - bear in mind that the paint can be applied, thickly, thinly, roughly, smoothly and every hand is different. This happens for a variety of reasons - thickness of paint, texture of paint, atmospheric conditions - and invariable frustrates folk. IT WILL GO...once the solvent evaporates completely it will be fine but this may take time. Remember that you don't buy Annie Sloan® Chalk Paint™ because you wanted it to look like Dulux and so please don't stress about it.
If you want to get rid of it now and diminish the look of patches, maybe because it is for sale, maybe because you are just like that then there is a wee technique
Making coloured wax
See how there is a blob of wax in the surface in this picture? And then a blob of paint added in....well that makes a coloured wax. I KNOW, I KNOW this shouldn't be possible (another benefit) and believe me I have tried to work out why it works ....these days I just accept it. Anyway if you want to blend out any dark patches just use the paint you have used on the piece (this picture obviously is using a contrasting colour) and mix with the wax and work over the area. I hope this has demystified the wax....and also helped you understand the best ways to apply it. Happy waxing guys!!


 as seen in Hampton's 1992 book,


 Posts