
I mentioned in my last post how jobs had run over...this was another one. This was a gilding job that went array but turned out BEAUTIFUL!!!! It took 3 times longer than it should have done.
When the lovely interior designer Allison Morse of Elizabeth Allison Interiors sent me the picture below and asked if I could come up with a finish to work with this picture frame and that could be put on a skirted bathtub
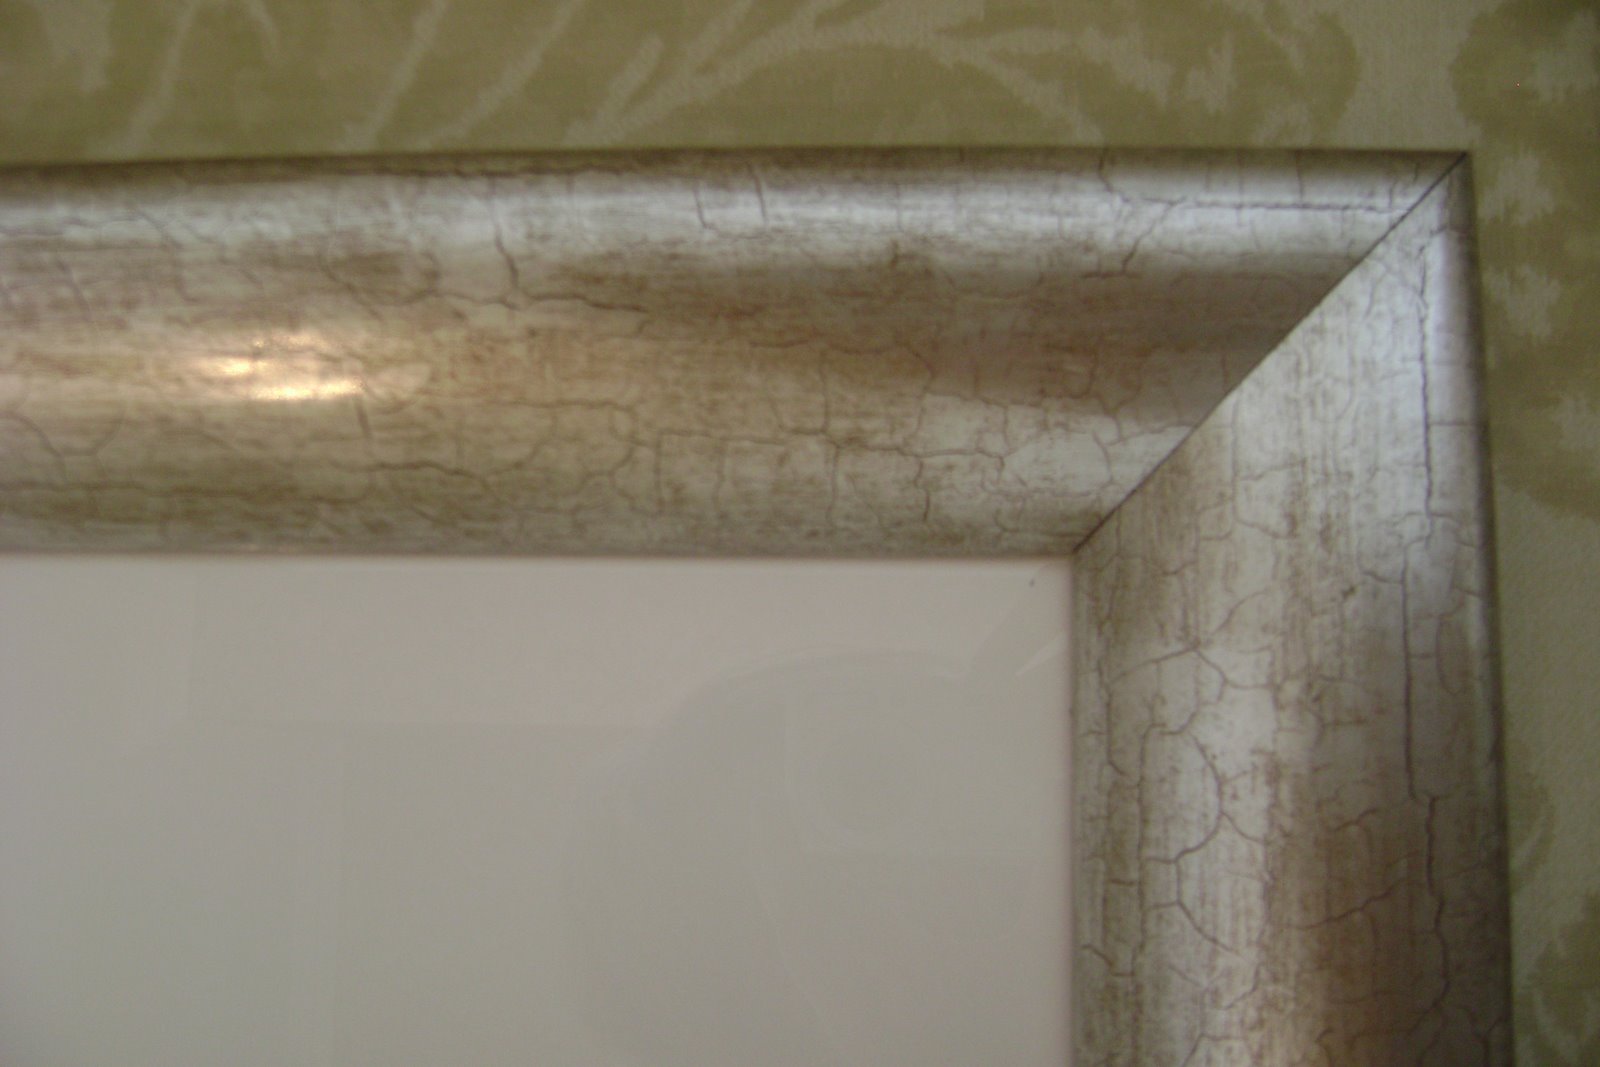
and the also needed to work with this chandelier... I put my thinking hat on. The frame is a sort of cracked metal leaf and the chandelier is a spattered silver paint. Both had reddy brown in them and a wash of warmth to them.

So the sample I produced is below
 |
| Gilding Sample |
I did this with a red basecoat, I used acrylic size and transfer aluminium leaf and I applied it very roughly. There were small gaps and I worked the skewings into the patches so it looks crackled. I overglazed it with a brown oil glaze and varnished and Allison loved it thankfuly.
And this was what we produced on the bathtub
 |
| Blending beautifully |
And I LOVE it!!!! and Allison LOVES it!!! and the client LOVES it!!!!So what was the hassle....I shall tell you - in detail, but if you are bored by technical scroll on down ...there are a few more pictures....
Technical stuff :)
You know, gilding in theory should be simple. You get the ground correct, you apply the size, you get the timing right and you apply the leaf.....you allow it to cure, do any ancillary glazes or finishes over the top and seal where required and you finish up with a lovely surface. Ohhhhh if only that was the case. If you can control the circumstances perfectly then MAYBE, bear in mind this is a maybe, you will have no problems.
So let's go back to the beginning and my sample. The sample was all done with acrylic. When I saw the tub, I realised it had already been painted in oil based. This is a metal tub and so every time someone has a bath the metal expands and contracts. In any other circumstance I would have converted from oil to water based and primed with Zinsser 123 but by doing this in this instance there would have been 2 rates of expansion and 2 rates of contraction on a substrate that had quite a lot of movement in it....this would probably have been fine for a while but may have resulted in the surface degrading...worse case scenario would be delamination. So since I am a belt and braces type of gal we decided to go with an oil based system.
The main difference in this instance is in the way the gold size (glue) behaves. Most acrylic size doesn't dry fully ever. It stays tacky. Oil based size dries at different rates depending on which you use, what manufacturer's product it is and also on the atmosphric conditions. You can buy a 1-2, 3, 12, 18 and 24 hour size. In most instances the number of hours refers to the potential window of time between application and the glue being too dry to work with. So for instance a 24 hour size can be applied at 3pm in the afternoon and will probably (depending on atmospheric conditions) be ready to gild on by about 9 am the next day and by 3pm it will be probably too dry to work on. However the Rolco 12 hour size is ready to gild on after 12 hours and then it stays open for 12 hours....so you can see that the first hurdle is the terminology can be confusing...also one manufacturer's size can behave differently to the next.
So given the variables and while mulling over the project I called my amazingly helpful and talented gilder friend Emily Swift-Jones to try and work out which oil size would be best. It was humid and had been for days, so we were looking for about a 6 hour maximum open time but I didn't want to wait hours between application of the size and the application of leaf...because I wanted the job to fall within a 10 hour working day maximum and with all this in mind Emily helped me decide on a mix of 2 sizes...based on the information given her advice was brilliant!
I was so very sure I had cracked it. Popped up to the job in the morning, applied my size and then shot off to go and get some materials, do some shopping etc. etc SURE in the knowledge that all was cool.....I had 2 hours to play with at least. Hmmmmm no-one mentioned the underfloor heating. When I had arrived in the morning it had been mild and wet. After I left the job the rain cleared and a cold dry wind got up...causing the thermostat to kick the underfloor heaitng into play that radiated through the metal at speed and dried the size to tack...a little too MUCH tack for my liking on my return
In a fury of gilding I applied the metal leaf at high speed but knew that without help I wouldn't get done before the size dried too much so an emergency cry went out to husband and painting business partner Gibson to get herere fast and he was here within the hour and we achieved a nice even finish ...only not the finish I had planned on
 |
| Nice but not how I planned it |
The gaps were too big between the leaf and the size had been too dry to pick up the skewings. Grrrrrr and in consultation Allison definitely didn't want big gaps, fair enough, that wasn't what the sample looked like.
So I called Emily...and her advise was "it is sometimes quicker to do it over again"...which I ignored. So I decided to add in some more on top...I knew it would end up being more blingy than the original but I reckoned I could use aluminium bronze powders to blend between the two, it would be fine.....hours and hours later and no I wasn't finished but this bronze powder was really working well...really was smooth and really a bit different and ohhhhhhhhhhhh shoot, I checked the label and they weren't bronze powders, they were water soluble burnishing powders ARRRGGGG...
 |
| Nice but not how I planned it |
Why didn't I listen to Emily
Back to the site...finish the job and seal off with shellac (hallelujah for shellac) and then a umbery oil glaze was the final stage before varnishing and this didn't happen till I had made sure it had cured hard... PHEW.
 |
| Happy! |
P.S. Note to self ...when an experienced and esteemed colleague says "it is sometimes quicker to do it over again", try not to ignore.....it certainly would have been quicker but all said and done I love it and I found a wonderful new burnishing powder that will work well in water based.


That is gorgeous Cait. I am always scared to do stuff like that, I never believe the varnish is good enough to protect the leaf! I have found, through bitter experience, that you can rarely 'fix" something and it is usually faster to do it over, and yet.....I go on trying!! I hate having to kick myself.
ReplyDeleteI would have started over if I wasn't absolutely sure that the whole lot was sound. By the time I had applied a shellac coating and an oil glaze and of course aluminium leaf doesn't tarnish ....so by the time I got to varnishing it I was sure it was all solid.
ReplyDeleteOh I forgot to say, I applied the shellac with a polishers rubber and actually that whole process of plishing meant that I went over the surface very thoroughly and so if anything had been unstable at that point...boy I would have known
ReplyDeleteOne word 'STUNNING'
ReplyDeleteThat tub is so SEXY! Lovely transformation Caity.
ReplyDeletebut you got there in the end and now have 2 new finishes to add to your portfolio ;) x
ReplyDeletenice pic btw. How many times have I found myself lying on my back trying to get a decent shot of a room lol
ReplyDeleteIt truly turned out just beautiful.
ReplyDeleteBut, OMG, I would have been so upset. Congrats for pulling it off! Now run to the bank...
Emily I was really pleased with the shot actually, cos normally my photos are fairly pants and yes..squashed up in a corner with my head on the skirting board
ReplyDeletegorgeous! how did you initially get the red to show thru in the wiggley way. (nice desription huh?, god!)
ReplyDeleteCat
PS: I was so laughing at the folly of trying to fix it b/c I am NOT doing it over damn it!
hi Cait.
ReplyDeletewondering if you recommend using metal laquer or shellac to seal dutch metal? I want to antique it after with prob oil glazes unless you have a better suggestion? Ive used waterbased size.(if this makes any difference )
thanks.
ps the bathtub is gorgeous x
Hi Marina
DeleteIn this instance I put an oil based varnish over the top, but normally if I was working with metal leaf and acrylic size like you are and not putting oil based glazes over the top then I would use the Robersons Universal Lacquer which is water based.
We stock it in the studio if you want to give it a go, give Katrine a call 01738 587600
In USA Rolco MSA is the one I hear everyone praising. Both are water white and the Universal can be used outside
Thanks Cait, will def get some lacquer off you for the next project, this one I'm going to antique with either wax or oil glaze. Thanks for all the info.
ReplyDeleteBest regards
Word to the wise - and most of the gilding professionals I know I am sure would say the same. I would never ever consider wax as a long term protective coating for metal leaf or low carat leaf. It is way too vapour permeable and absorbent of moisture. It tends to hold the moisture too which is why wax will bloom in cold weather
ReplyDeleteIf you are using oil glazes I would use an oil varnish. I would use shellac as an isolating layer
Thanks Cait.
ReplyDeletereally appreciate the information and advice. Its a minefield out there! Normally I gild architectural ceilings with 24 hour size and just gild with 23 ct the next day..job done! Its a whole new world with dutch gold,distressing, sealing etc. so once again thanks.x
I tend to be belt and braces these days with Dutch metal ....I NEVER guarantee it and I always ask the client to sign a disclaimer, except of course for Aluminium
Delete